How to Properly Strip and Terminate Different Wire Types
Knowing How to Strip Wire Correctly: A Foundational Skill for Professional Electricians
Knowing how to strip wire correctly is a foundational skill that separates professional electricians from amateurs. A proper strip and termination ensures a safe, reliable, and code-compliant electrical connection that lasts for decades. Using the right professional wire strippers for the job and understanding proper insulation removal techniques are critical for conductor nicking prevention. Whether you are making a connection with traditional wire nuts or modern wago wire connectors, the integrity of the conductor is paramount. Faulty terminations are a leading cause of electrical failures and fires. This guide covers everything a licensed electrician needs to know, from selecting the right tools and stripping standard THHN/THWN wire to advanced techniques for MC cable armor removal and terminating aluminum conductors, all while adhering to NEC 110.14 standards.
The Foundation: Essential Tools and Safety for Wire Preparation
Before you even touch a wire, having the right gear is non-negotiable. Your electrician tool belt or electrician tool bag should be stocked with high-quality tools designed for precision and safety.
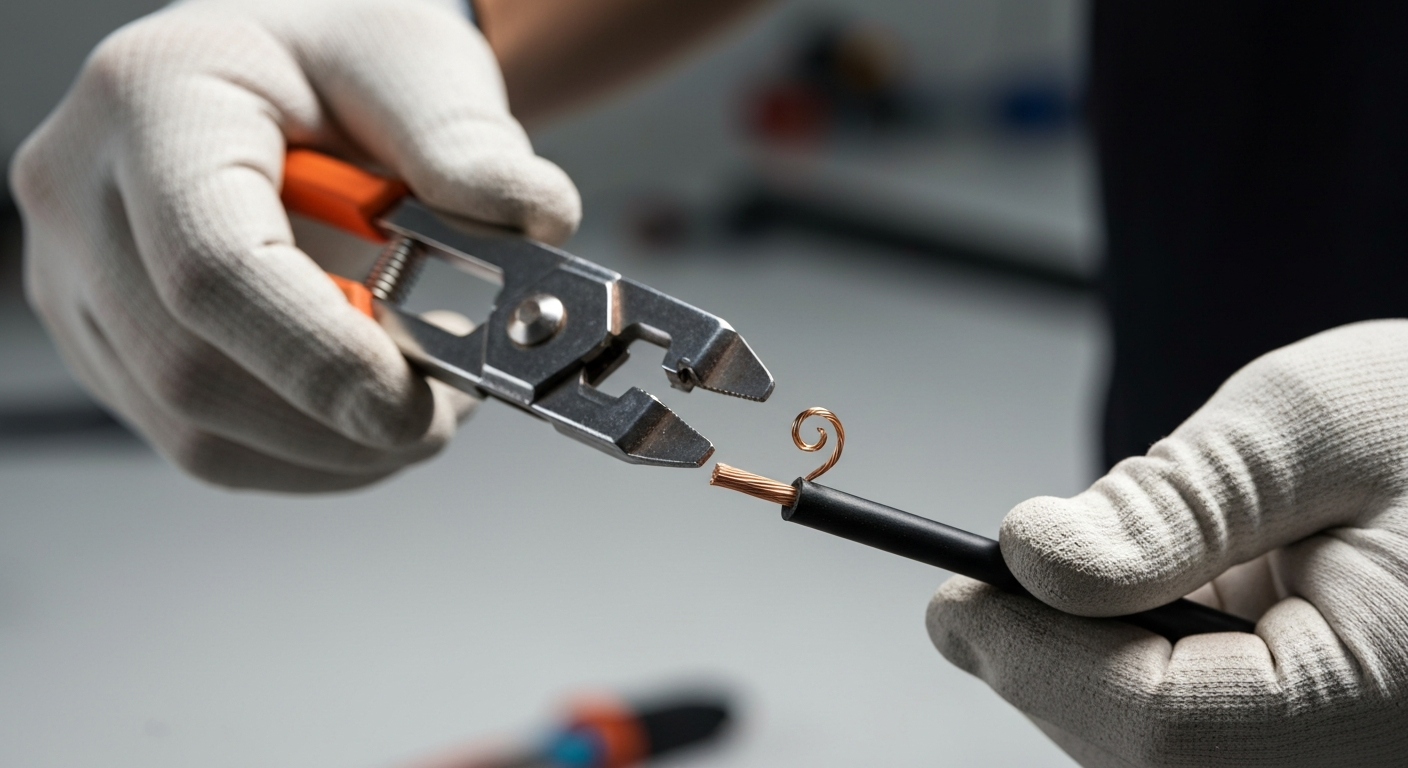
At the heart of the task are wire strippers. While a cheap diy wire stripper or a dangerous technique seen in a viral electrical cable stripper video might seem fast, they significantly increase the risk of nicking the conductor, which creates a hot spot and a potential point of failure.
Key tools for stripping and termination include:
- Professional Wire Strippers: These come in various forms. A good pair of manual strippers with clearly marked AWG sizes is essential. For repetitive tasks, an automatic wire stripper (also called an auto wire stripper) can be a massive time-saver. For larger jobs, a bench-mounted wire stripper machine or electric wire stripper is a major investment but offers unparalleled efficiency.
- Cable Slitters and Knives: For larger cables like MC or URD, a dedicated cable jacket slitter is the safest tool for removing the outer sheath. While utility knife stripping is a technique used by some experienced electricians, it requires extreme caution to avoid cutting too deep.
- Termination Tools: This includes lineman’s pliers, a good wire bending tool for shaping conductors around screw terminals, and drivers for terminal screws (including a flathead screwdriver).
- Safety Gear: Always wear electrician gloves rated for the voltage you’re working with, along with appropriate eye protection.
A Step-by-Step Guide: How to Strip Wire Like a Pro
Following a consistent process is key to perfect, repeatable results and is the core of professional insulation removal techniques. This process focuses on conductor nicking prevention, which is critical for meeting electrical termination standards.
- Select the Correct Tool and Gauge: Match the stripping tool to the wire type and size. For a multi-gauge stripper, locate the hole that corresponds to your conductor’s AWG (e.g., 12 AWG for yellow Romex). Using a slot that’s too small will damage the conductor.
- Measure the Strip Length: Refer to the device or connector for the recommended strip length. Most quality receptacles and switches have a strip gauge molded into the housing. For wire nuts or push in wire connectors, check the manufacturer’s instructions. A typical length is 1/2″ to 3/4″.
- Position and Clamp the Wire: Place the wire in the correct slot on your strippers at the measured length. Clamp down firmly. The goal is to cut through the insulation without scoring the copper or aluminum underneath.
- Remove the Insulation: With the tool clamped, twist it slightly (about a quarter turn) around the conductor to ensure the insulation is fully scored. Then, pull the strippers straight off the end of the wire. The insulation slug should come off cleanly, revealing a pristine, un-nicked conductor.
- Inspect the Conductor: Visually and physically inspect the stripped portion of the wire. There should be no nicks, cuts, or scrapes on the metal. If you find any damage, cut the wire back and start over.
Terminating Different Wire and Cable Types
The technique for termination varies significantly depending on the wire and the connection method. Adhering to NEC 110.14 (Electrical Connections) is mandatory. For a detailed breakdown of code updates, it’s crucial to understand the 2023 NEC terminal connection requirements.
Solid vs. Stranded Conductors (THHN/THWN)
The stranded vs solid conductor debate often comes down to application. Solid wire is great for simple runs and back-wiring devices, while stranded offers flexibility for routing through conduit.
- Screw Terminals: For solid wire, use your pliers or a wire bending tool to form a hook or loop (approximately 3/4 of a circle) in the clockwise direction. Place it under the terminal screw and tighten so the screw pulls the loop closed. Stranded wire should not be placed directly under a screw unless the terminal is specifically listed for it; use a crimp-on fork or ring terminal instead. It’s also vital to review how new NEC rules on snap switch terminations might impact your work on common devices.
- Splicing Connectors: For splicing, options include the traditional twist on wire connector (commonly known as wire nuts) or modern alternatives. The wago connector is a popular type of push in wire connectors (wago wire connectors) that offers a fast and secure connection for solid and stranded wire.
Handling Armored and Service Cables (MC, URD, XHHW)
Larger and armored cables require specialized techniques.
- MC Cable Armor Removal: Use a dedicated rotary cutter (cable jacket slitter) to score the armor without penetrating the THHN/THWN wire inside. Snap the armor and slide it off, then install the required anti-short bushing.
- URD Cable Preparation: For underground residential distribution (URD) cables, which often have tough XHHW insulation, a sharp, specialized knife and careful technique are needed for stripping.
- Large Conductor Termination: Large conductors often require crimp lug installation. This involves using a hydraulic or manual crimper and correctly sized lugs. For heavy-duty splices, a split bolt connector is a common choice, which must then be thoroughly wrapped with insulating materials.
Special Considerations: Aluminum and Low Voltage
- Terminating Aluminum Conductors: This requires extreme care. You must use connectors explicitly rated for aluminum (CU/AL), apply an anti-oxidant compound to the conductor, and follow the manufacturer’s torque specifications precisely.
- Low Voltage and Automotive Connectors: For data, security, or automotive work, you may encounter different connectors like low voltage wire connectors or specific automotive wire connectors. An insulation piercing connector (IPC) is a device that makes a connection without stripping the wire. So, what is an insulation piercing connector? It’s a connector with metal teeth that bite through the insulation to contact the conductor, often used in low-voltage lighting and data applications.
Securing and Insulating Your Connections
A good termination isn’t complete until it’s properly insulated and secured.
- Insulation: For exposed connections like a split bolt connector, use high-quality electrical tape (often called tape for electricity). Apply it by stretching the tape to about half its original width and overlapping each layer by half. Liquid electrical tape can provide a waterproof and durable coating in certain applications.
- Securing: Properly securing cables with staples is crucial, and requirements are outlined in the NEC (e.g., Article 334.30 for NM cable). Use an electric staple gun or hammer with the correct wire staples for the cable type. For example, use a listed insulated staple suitable for the cable type (e.g., for 10/3 NM cable) to avoid damaging the cable jacket. The goal of using a wire staple is to secure the cable without compressing or damaging it.
Verification and Testing for Reliable Terminations
After completing a circuit, verification is key. This is where a multimeter becomes invaluable for both verification and troubleshooting. While knowing how to test a capacitor with a multimeter on an HVAC unit or learning how to check a fuse with a multimeter are broader diagnostic skills every electrician uses, its direct role in termination is to confirm continuity. After making a connection, you can set your meter to ohms (meter ohm setting) to ensure you have a solid, low-resistance path. For troubleshooting, knowing how to test a fuse with a multimeter is a fundamental diagnostic skill. To check capacitor with multimeter, or test capacitor with multimeter, is another common task that every seasoned pro should master.
For critical systems, insulation testing with a megohmmeter (often called by the brand name megger meter) is performed to ensure insulation integrity after installation. If connections seem faulty, cleaning them with electrical contact cleaner before re-torquing can sometimes resolve issues. Remember, a thorough understanding of how device terminations are impacted is crucial; for more, see how 2023 NEC changes affect receptacle termination types.
Perfect the basics to ensure safe, reliable connections on every job.
Primary Sources & E-E-A-T
As professionals, our work is governed by standards that ensure safety and interoperability. This article is written in accordance with best practices and the requirements of the National Electrical Code (NEC).
- NFPA 70, National Electrical Code (NEC): The authoritative source for electrical installation in the United States. Article 110.14 is particularly relevant to this topic. View the NEC at NFPA.org
- ExpertCE: Content is developed and reviewed by certified instructors and licensed Master Electricians.
Frequently Asked Questions (FAQ)
Q1: What is the best way to learn how to strip wire without nicking the conductor?
The best way is to use a high-quality wire stripper with precisely milled holes for each wire gauge. Avoid using utility knives until you are extremely experienced. Practice on scrap pieces of wire, intentionally using the wrong gauge slot to see how it damages the conductor. This helps develop a feel for proper conductor nicking prevention.
Q2: Are push in wire connectors like the Wago connector better than traditional wire nuts?
Both have their place. Push in wire connectors like the wago connector are often faster to install and provide a very reliable connection, especially for solid conductors. Traditional wire nuts (a type of twist on wire connector) are cost-effective and have been a proven method for decades. The “better” choice often depends on the specific application, local codes, and electrician preference, but both are acceptable when used correctly.
Q3: What other tools are essential in an electrician tool bag for termination work?
Beyond strippers, every electrician tool bag should contain a quality multimeter for testing, a torque screwdriver or wrench to meet NEC 110.14(D) requirements, lineman’s pliers, needle-nose pliers, and multiple screwdrivers (including a flathead screwdriver). For larger jobs, specialized tools like a crimping tool for connectors, a megohmmeter, and even an electric wire stripper can be invaluable.
Continuing Education by State
Select your state to view board-approved continuing education courses and requirements:
Disclaimer: The information provided in this educational content has been prepared with care to reflect current regulatory requirements for continuing education. However, licensing rules and regulations can vary by state and are subject to change. While we strive for accuracy, ExpertCE cannot guarantee that all details are complete or up to date at the time of reading. For the most current and authoritative information, always refer directly to your state’s official licensing board or regulatory agency.
NEC®, NFPA 70E®, NFPA 70®, and National Electrical Code® are registered trademarks of the National Fire Protection Association® (NFPA®)
You may also like

Colorado Electrical Licensing Requirements and Reciprocity Guide

Standby Generators in DE: Navigating Coastal Storm Regulations
