How to Clean AC Condenser and Evaporator Coils Safely
Learning how to clean air conditioner coils is a fundamental task in HVAC maintenance, but for a licensed electrician, the process involves critical safety considerations that go beyond a simple washdown. Properly cleaning an air conditioning unit involves a meticulous approach to electrical safety, component protection, and system verification. This guide outlines the professional-grade procedure, emphasizing AC disconnect and lockout/tagout protocols, correct use of an air conditioner coil cleaner, and post-cleaning electrical checks. Whether you’re servicing a standard split system, a large commercial unit, or a modern mini-split air conditioner, ensuring all electrical components are de-energized and protected is paramount. This process not only improves system efficiency and lifespan but also upholds the highest standards of professional and personal safety on the job site.
The Electrician’s Vital Role in HVAC Maintenance
While HVAC technicians typically handle the refrigerant and airflow aspects of an AC unit, electricians play a crucial and often overlapping role. A comprehensive HVAC maintenance checklist for electricians includes more than just verifying power; it involves ensuring the entire electrical system of the unit is safe, efficient, and up to code. Understanding how the 2023 NEC defines equipment servicing and maintenance is key. Cleaning coils falls directly into this scope, as it requires interaction with high-voltage components. From the disconnect to the contactor, capacitors, and fan motor, an electrician’s expertise is essential for performing the job safely and correctly, preventing costly damage to the unit or—more importantly—serious injury.
Essential Safety Protocols: AC Disconnect and Lockout/Tagout
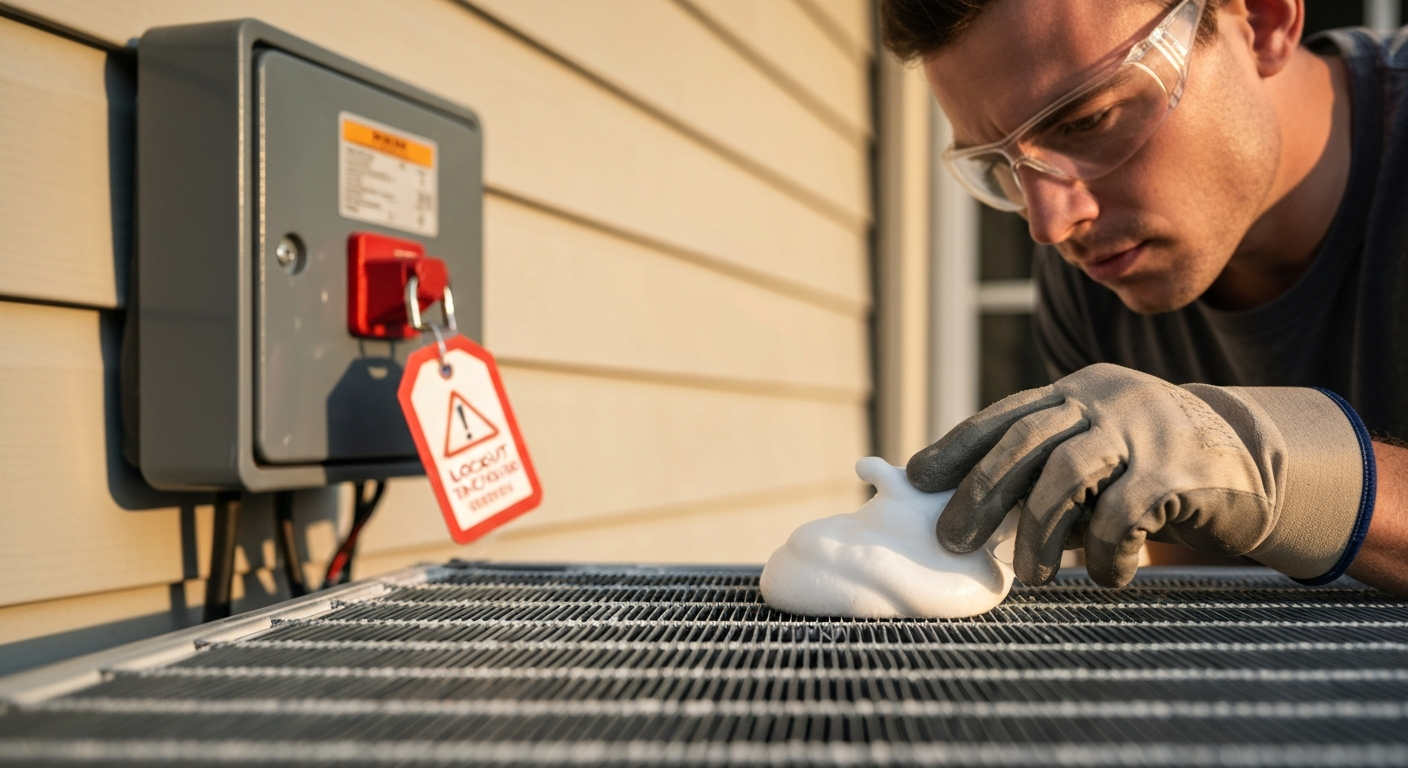
Before any cleaning solution or water comes near an AC unit, the first and most critical step is a verified electrical de-energization. Adhering to strict AC disconnect and lockout/tagout (LOTO) procedures is non-negotiable. This aligns with OSHA standards and the principles of NFPA 70E and HVAC safety. An electrician must be able to properly identify the disconnecting means for the specific unit, whether it’s a breaker in a panel or a fused or non-fused disconnect near the outdoor condenser. Always use a multimeter to verify zero energy state at the unit’s terminals after applying the lock and tag. This step alone distinguishes professional service from amateur attempts and is the foundation of safe HVAC work.
Step-by-Step Guide: How to Clean HVAC Coils Professionally
Once the unit is safely de-energized, the cleaning process can begin. This process varies slightly between outdoor condenser coils and indoor evaporator coils.
Step 1: Cleaning the Outdoor Condenser Coils
The outdoor unit, housing the air conditioner condensers, is exposed to dust, leaves, grass clippings, and other airborne debris. This buildup insulates the coils and forces the compressor to work harder, reducing efficiency and lifespan. This process is similar for a standard home unit or a much larger 5 ton air conditioner.
- Perform LOTO: As detailed above, de-energize and lock out the power source.
- Clear Debris & Assess Damage: Remove the top grille and fan assembly. Clear out any leaves or heavy debris from inside the unit. This is a crucial time for assessing coil fin damage; use a fin comb to gently straighten any bent fins.
- Protect Electrical Components: Use plastic sheeting and tape to cover the compressor terminals, capacitors, contactor, and all wiring. Meticulous electrical component protection during washdown is essential to prevent shorts or component failure.
- Select and Apply Cleaner: Choose a quality air conditioner condenser cleaner. An air conditioner foaming coil cleaner is often preferred as it expands to penetrate deep into the coil bed, pushing dirt outward. Apply the cleaner from the inside out, if possible, to drive debris away from the unit’s interior.
- Rinse Thoroughly: Using a garden hose with a spray nozzle, rinse the coils from the inside out. Avoid using a high-pressure washer, as it can easily damage the delicate aluminum fins.
- Reassemble and Test: Once dry, reassemble the fan and grille. Remove all protective coverings from electrical components. Restore power and verify the unit, including the condenser fan, starts and runs correctly.
Step 2: Cleaning Indoor Evaporator Coils
The evaporator coil, located in the indoor air handler, presents different challenges. It is prone to dust, pet dander, and biological growth, which can lead to troubleshooting dirty sock syndrome (a musty odor when the AC kicks on). For these coils, a no-rinse evaporator coil cleaner is the best choice. This type of air conditioner cleaner spray is formulated to dissolve dirt and condensate, which then drains away through the primary drain line. Thorough cleaning of the indoor unit is a key part of preventative maintenance for air handlers.
Special Considerations for Mini Split Systems
The rise in popularity of the mini-split air conditioner has introduced new maintenance considerations. While many homeowners are tempted by diy mini splits or a diy mini split project, professional cleaning and service are still vital. The process for a ductless air conditioner installation, whether it’s a wall-mounted unit or a mini split ceiling cassette, creates a compact system where coils are harder to access. When a client asks “how to install a mini split,” they often overlook the maintenance. Though some resources detail how to install mini split systems, the electrical tie-in and subsequent maintenance require a licensed professional. The mini split installation or aircon mini split installation must be done correctly to allow for service access. Cleaning these units often requires special bibs to catch water and cleaner, reinforcing the need for professional service over a mini split diy attempt. The complete installation of mini split air conditioner should always include a client briefing on proper maintenance schedules, as even the best diy mini split systems require professional attention.
The Electrician’s Post-Cleaning Checklist and Advanced Diagnostics
After cleaning, an electrician’s job isn’t done. This is the perfect opportunity to perform a full electrical inspection of the air conditioning unit.
- Wiring Integrity: Perform a thorough condenser fan motor wiring inspection and low voltage control wiring inspection. Look for chafed, burnt, or loose connections.
- Capacitor Health: The process of testing start/run capacitors with a capacitance meter is crucial. A weak capacitor can lead to hard starting and compressor damage. This is also when you might recommend an air conditioner hard start kit or a soft start for air conditioner to reduce inrush current and extend component life.
- Contactor and Relay Service: An HVAC contactor and relay service involves checking for pitted or burnt contacts, which can cause intermittent operation.
- Advanced Diagnostics: For high-value equipment or troubleshooting, performing megohmmeter testing for compressors can identify insulation breakdown before a catastrophic failure occurs.
A deep understanding of these electrical checks is what sets a professional apart. Learn essential maintenance and safety procedures in our continuing education courses.
Choosing the Right Coil Cleaner
The market is flooded with products, from a general hvac coil cleaner to a specialized coil cleaner for air conditioner. Understanding the types is key. For routine residential jobs, a non-acidic, foaming cleaner is safe and effective. For heavy-duty jobs, like commercial AC condenser coil cleaning, stronger alkaline or acid-based cleaners may be necessary. However, their use requires extreme caution and must comply with manufacturer guidelines and EPA regulations on chemical handling. As acid-based coil cleaner safety protocols are strict, it’s critical to know that many acid-based cleaners are not suitable for modern aluminum coils and can cause significant corrosion. These cleaners can also damage roofing materials, harm vegetation, and cause severe skin burns if mishandled. Always follow the manufacturer’s directions and consider how unit placement, such as AC unit placement near wet locations, could affect runoff.
Primary Sources
- NFPA 70®, National Electrical Code® (NEC®)
- NFPA 70E®, Standard for Electrical Safety in the Workplace®
- OSHA Standard 1910.147, The control of hazardous energy (lockout/tagout)
Frequently Asked Questions (FAQ)
What’s the first step for an electrician before they learn how to clean air conditioner coils?
The absolute first step is safety: performing a full AC disconnect and lockout/tagout procedure. This involves turning off the breaker and/or disconnect switch, applying a personal lock and tag, and then using a multimeter to verify a zero-energy state at the unit’s power terminals before any work begins.
Can I use any air conditioner coil cleaner on both evaporator and condenser coils?
No, it’s not recommended. Condenser coils are typically cleaned with a more aggressive air conditioner condenser cleaner that must be rinsed off. For indoor evaporator coils, you should use a self-rinsing or no-rinse evaporator coil cleaner that is specifically designed to be safe for indoor use and will drain away with normal condensation.
When performing a mini split ac installation, how often should the coils be cleaned?
After a new mini split ac installation, the coils should be professionally cleaned at least once a year. For units in environments with high dust, pets, or smokers, cleaning may be required every six months to maintain efficiency and air quality and prevent issues that require troubleshooting dirty sock syndrome.
What are the main risks associated with using an acid-based coil cleaner?
The primary risks involve both safety and property damage. There are significant acid-based coil cleaner safety concerns, including severe chemical burns to skin and eyes. Additionally, acid can damage the delicate aluminum fins, corrode copper tubing, and harm surrounding materials like roofing, siding, and landscaping if not properly contained and neutralized.
What’s involved in an HVAC contactor and relay service during routine maintenance?
A proper HVAC contactor and relay service involves visually inspecting the contact points for signs of arcing, carbon buildup, or pitting. If minor, the contacts can sometimes be cleaned with a contact burnishing tool. For moderate to severe pitting, the contactor should be replaced to ensure reliable operation of the compressor and condenser fan motor.
Continuing Education by State
Select your state to view board-approved continuing education courses and requirements:
Disclaimer: The information provided in this educational content has been prepared with care to reflect current regulatory requirements for continuing education. However, licensing rules and regulations can vary by state and are subject to change. While we strive for accuracy, ExpertCE cannot guarantee that all details are complete or up to date at the time of reading. For the most current and authoritative information, always refer directly to your state’s official licensing board or regulatory agency.
NEC®, NFPA 70E®, NFPA 70®, and National Electrical Code® are registered trademarks of the National Fire Protection Association® (NFPA®)
You may also like

Colorado Electrical Licensing Requirements and Reciprocity Guide

Standby Generators in DE: Navigating Coastal Storm Regulations
