Choosing and Installing Old Work vs. New Work Electrical Boxes
Choosing between an old work and a new work electrical box is a fundamental decision dictated by project timing. A new work box, or nail-on box, is used during the rough in electrical phase when wall studs are exposed. In contrast, an old work electrical box, also known as a remodel electrical box, is specifically designed for installation into existing, finished walls where direct stud access is unavailable. The primary advantage of an old work box, often called a swing clamp box, is its integrated clamping mechanism—typically mounting ears and support wings—that allows for secure mounting directly to the drywall or plaster. This makes the process of retrofitting electrical outlets and switches significantly more efficient. A proper cut-in box installation is critical for securing devices in finished walls, ensuring a stable, code-compliant result without needing to open up large sections of the wall.
Understanding the Fundamental Difference: New Work vs. Old Work
In the electrical trade, the choice between box types hinges entirely on one factor: the state of the wall assembly. This choice impacts installation methods, tools required, and overall project workflow.
New Work Boxes are the standard for new construction and major renovations where wall cavities are open. They feature integrated brackets, flanges, or nails that allow for direct and rigid fastening to wall studs or ceiling joists. This direct mounting provides exceptional stability. A common term you’ll hear in this context is the nail-on box comparison, as these boxes are simply nailed or screwed into the framing before any drywall is hung. This is the preferred method during the rough in electrical stage.
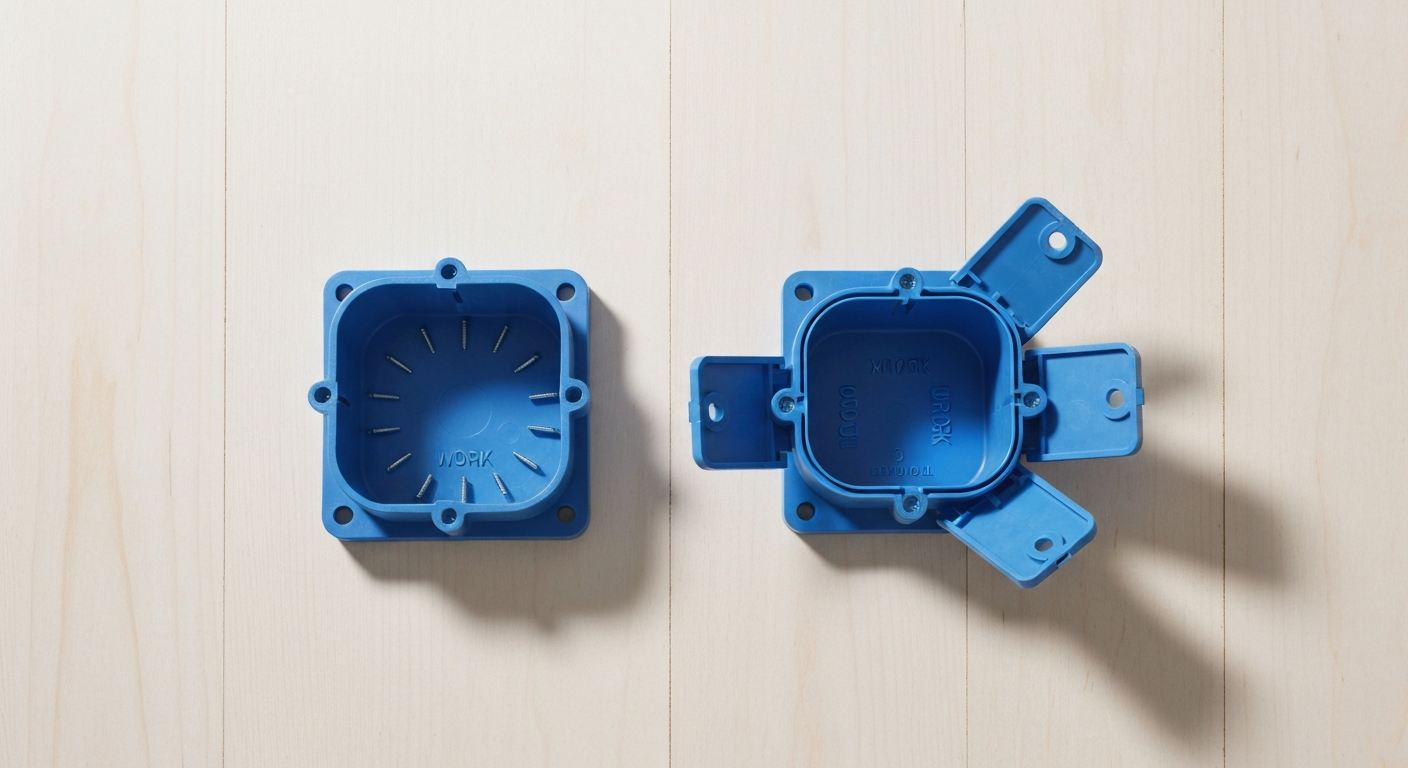
An old work electrical box serves a different purpose. These are engineered for projects where you are adding or moving an outlet, switch, or fixture in a room with intact, finished walls. Since you cannot access the studs, these boxes rely on clever studless mounting techniques to anchor themselves firmly to the back of the drywall or plaster, providing a secure base for the electrical device.
A Deep Dive into the Old Work Electrical Box
The remodel electrical box is an indispensable component for service work and remodels. Its design solves the common problem of adding electrical access points to finished spaces cleanly and securely.
Key Features: Mounting Ears and Support Wings
The genius of the old work box lies in its mounting system. After a precisely cut hole is made in the wall, the box is inserted. By turning the integrated screws, you activate the mounting ears and support wings. These clamps swing out behind the wall surface and are drawn tight against it, sandwiching the drywall between the box’s front flange and the rear clamp. This design is what makes a swing clamp box so effective for securing devices in finished walls without any need for structural framing support.
Common Types and Applications
Old work boxes are not one-size-fits-all. Professionals must select the appropriate type for the specific application:
- Standard Gangable Boxes: For single or multiple switches and outlets.
- Shallow Old Work Box: Essential for installations in limited-depth stud cavities or shallow framing where a full-depth box won’t fit; their reduced volume makes careful wire management critical. (For concrete or masonry walls you generally need a masonry/in-wall box or a surface-mounted box rather than a standard drywall “old-work” clamp box.)
- Ceiling Fan Rated Remodel Box: This is a non-negotiable requirement for mounting ceiling fans. These heavy-duty boxes include an adjustable metal brace that expands between joists, providing the structural support needed to handle the weight and dynamic load of a fan, as mandated by NEC requirements for luminaire and fan support. A standard remodel box is not sufficient or safe.
- Pancake Electrical Box: A very shallow, typically round box used for mounting lightweight wall sconces or ceiling lights directly on a surface where a standard-depth box won’t fit.
- Electrical J Box: An old work box can also serve as an electrical j box, providing an accessible enclosure for wire splices within a finished wall, provided it remains accessible.
Step-by-Step Guide: Professional Cut-in Box Installation
A successful cut-in box installation requires precision and a clear process. Following these steps ensures a clean, secure, and professional result.
- Planning and Layout: First, determine the exact location. Use a stud finder to ensure you are placing the box in an empty wall cavity. Adhere to standard industry conventions for heights: the standard outlet height or typical outlet height is generally 12-16 inches from the finished floor to the bottom of the box. The standard light switch height (or just light switch height) is typically 48 inches. In kitchens, the kitchen counter outlet height or countertop outlet height must be positioned to serve the counter space without interfering with the backsplash, usually 4-6 inches above the counter surface. While these are common professional standards, the NEC does not specify these exact heights for general use.
- Tracing and Cutting the Opening: Place the face of the old work box against the wall and carefully trace its outline (do not trace the front flange). For drywall, a jab saw is effective. For a challenging plaster and lath installation, use a multi-tool with an oscillating blade to cut through the plaster and wood lath carefully to minimize cracking.
- Gaining Wall Cavity Access for Wiring: This is the most crucial step for routing power. Fish the non-metallic sheathed cable from the power source or another outlet to the new opening. This may require drilling through top or bottom plates or, in complex situations, creating a temporary access panel. Where the cable sheath is required to enter a box, the NEC requires the sheath to extend a short distance into the box (typically noted as 6 mm / about 1/4 in. in the code) or be secured with an approved connector or clamp.
- Installing the Box: Strip the cable sheathing, ensuring that the sheathing extends at least 6 mm (approximately 1/4 inch) into the box where required by the code and any cable clamps are used. Push the cable through the designated entry point on the box. Insert the box into the wall opening, ensuring the front flange is flush and square. Tighten the mounting screws evenly to engage the support wings until the box is held firmly in place. Do not overtighten, as this can damage the drywall or the box itself.
Code Compliance and Critical Calculations
Professional installation goes beyond physical mounting; it demands strict adherence to the National Electrical Code (NEC) to ensure safety and functionality.
Mastering NEC Box Fill Calculations
Every electrical box has a maximum volume, and overcrowding it with wires, devices, and clamps is a serious code violation and fire hazard. Performing accurate NEC box fill calculations is a mandatory skill. You must account for each conductor, device, and clamp within the box to ensure you don’t exceed its capacity. This is especially true when using a shallow old work box with limited volume or a large commercial box (for example, boxes rated at 1650 cm³ / 100 in³ or larger in some applications). To ensure you are performing these calculations correctly, it’s vital to review the latest standards on how to calculate outlet box dimensions according to the 2023 NEC. Furthermore, understanding how to properly size junction boxes is equally important, particularly when dealing with complex circuits; you can learn more about how to calculate junction box size with terminal blocks per the NEC 2023 for these scenarios.
The Importance of UL Listed Electrical Boxes
Always ensure that every component you install, especially the box itself, is properly certified. Using UL listed electrical boxes guarantees that the product has been tested by Underwriters Laboratories and meets established safety and quality standards. This is a non-negotiable aspect of professional electrical work and a cornerstone of E-E-A-T (Experience, Expertise, Authoritativeness, Trust).
Key Considerations for a Flawless Installation
- Wall Material Matters: A plaster and lath installation requires more finesse and different cutting tools than standard drywall. Always identify the material before you begin.
- Box for the Job: Never use a standard remodel box for a heavy, dynamic load. Always install a ceiling fan rated remodel box for fans and heavy fixtures.
- Calculate Before You Insulate: Perform your NEC box fill calculations before you finish pulling wire to ensure the chosen box is adequate.
- Plan Your Cable Route: Effective wall cavity access for wiring is key. Plan your route to minimize drywall damage and ensure you can get the cable where it needs to go.
- Verify Circuit Load: When retrofitting electrical outlets, confirm that the existing branch circuit can safely handle the additional load you are adding.
By understanding the distinct roles of old work and new work boxes and mastering the techniques for secure, code-compliant installation, you elevate the quality and safety of your electrical work. Master the techniques for clean and secure residential and commercial work.
Primary Sources for Electrical Codes & Standards
For the most current and official regulations, always refer to the source. The National Electrical Code (NEC) is published by the National Fire Protection Association (NFPA).
Frequently Asked Questions (FAQs)
- What is the main advantage of using an old work electrical box for retrofitting electrical outlets?
- The primary advantage is its ability to be installed in a finished wall without needing access to studs. An old work electrical box utilizes studless mounting techniques, relying on built-in mounting ears and support wings that clamp onto the back of the drywall or plaster for a secure fit, making the process of retrofitting electrical outlets fast and efficient.
- How do you perform a cut-in box installation in a wall with plaster and lath?
- A cut-in box installation in this material requires more care than in drywall. It’s best to use an oscillating multi-tool with a blade designed for wood and plaster to make a precise cut. This minimizes vibration and helps prevent the surrounding plaster from cracking. A successful plaster and lath installation is about control and using the right tool for the job.
- Are there special considerations for a shallow old work box regarding NEC box fill calculations?
- Yes, absolutely. A shallow old work box has significantly less cubic volume than a standard depth box. Therefore, your NEC box fill calculations are even more critical. You must be meticulous in counting conductors, devices, and clamps to ensure you do not exceed its rated capacity, which is a common but dangerous code violation.
- When is a ceiling fan rated remodel box required over a standard remodel electrical box?
- A ceiling fan rated remodel box is mandatory whenever you are installing a ceiling fan on a finished ceiling. A standard remodel electrical box is not designed to support the weight or dynamic stress (vibration) of a fan. The fan-rated box includes a heavy-duty brace that spans between ceiling joists, providing the necessary structural support required by the NEC and UL safety standards.
Continuing Education by State
Select your state to view board-approved continuing education courses and requirements:
Disclaimer: The information provided in this educational content has been prepared with care to reflect current regulatory requirements for continuing education. However, licensing rules and regulations can vary by state and are subject to change. While we strive for accuracy, ExpertCE cannot guarantee that all details are complete or up to date at the time of reading. For the most current and authoritative information, always refer directly to your state’s official licensing board or regulatory agency.
NEC®, NFPA 70E®, NFPA 70®, and National Electrical Code® are registered trademarks of the National Fire Protection Association® (NFPA®)
You may also like

Colorado Electrical Licensing Requirements and Reciprocity Guide

Standby Generators in DE: Navigating Coastal Storm Regulations
