How to Wire a Ceiling Fan with a Light: A Step-by-Step Guide
The Definitive Guide to Ceiling Fan Wiring
Properly executing ceiling fan wiring is a fundamental task for any licensed electrician, but mastering the nuances separates the professional from the novice. This guide details how to wire a ceiling fan with a light kit, focusing on NEC compliance and best practices. The most common and professional method involves dual switch fan light wiring, which provides independent control over the fan motor and the light fixture. This requires running a three-conductor cable (plus ground) from the switch box to the ceiling outlet. The entire assembly must be supported by a listed fan-rated electrical box, which is designed to handle the dynamic load and vibration of a running fan. Whether you’re installing a new fan or upgrading an existing light fixture, understanding these principles ensures a safe, code-compliant, and functional installation that meets client expectations every time.
Foundational Requirements for NEC-Compliant Ceiling Fan Installation
Before a single wire is stripped, a professional installation begins with the mechanical and structural requirements outlined in the National Electrical Code (NEC). An NEC ceiling fan installation is governed primarily by NEC 422.18, which mandates that ceiling-suspended paddle fans be supported independently of an outlet box or by listed outlet boxes or outlet box systems identified for the purpose and listed for the weight to be supported.
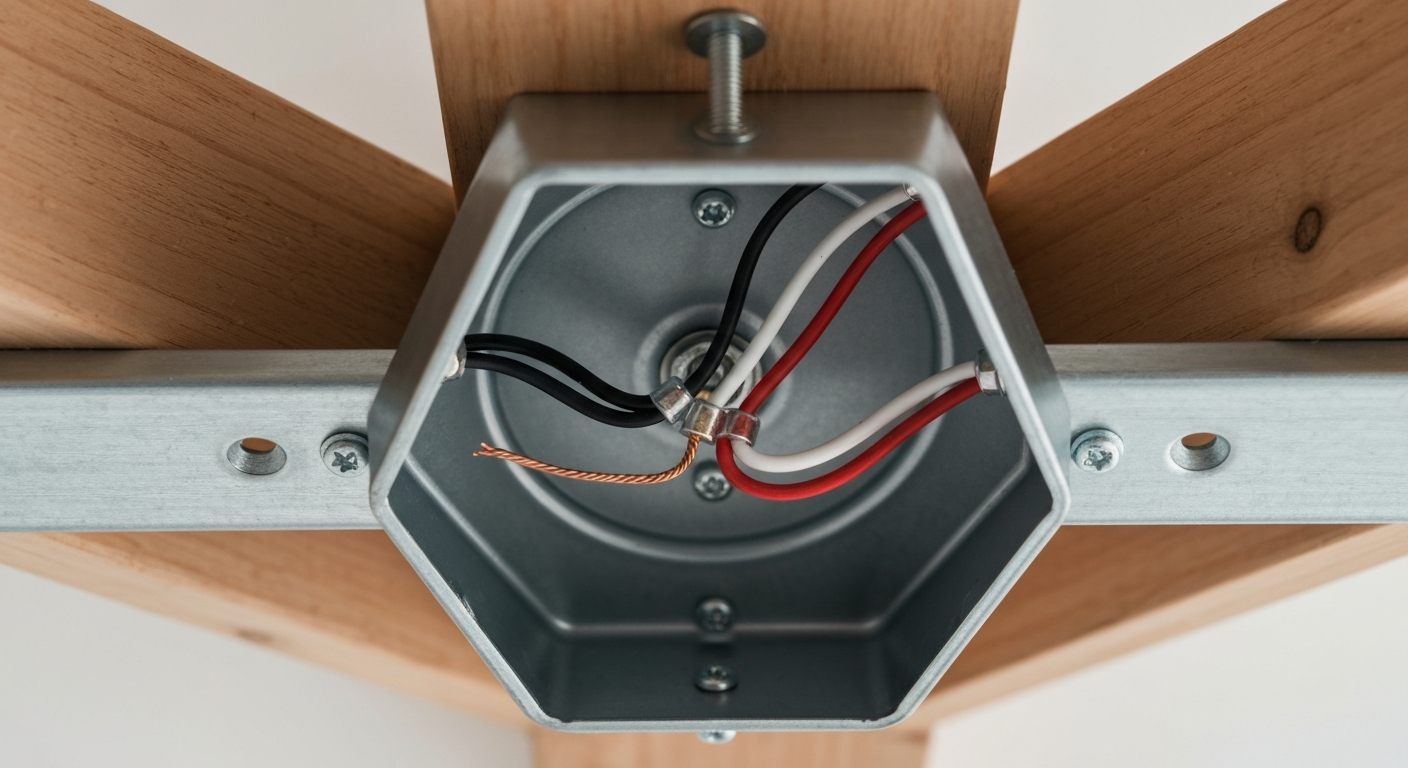
This means you must use a dedicated fan-rated electrical box, which is stamped with its maximum weight rating for a fan. These boxes are designed to withstand the stress and vibration a fan exerts. For installations where the box is mounted between joists, a ceiling fan support brace is essential. This adjustable metal brace spans the joists and provides a solid, secure mounting point for the box. The professional’s ceiling fan installation cost is partly justified by ensuring these critical safety components are used, preventing the catastrophic failure of a fan falling from the ceiling. This attention to foundational safety is what builds the trust required for a homeowner to rely on that same expert for a range of other electrical projects, from EV charger installs to a christmas lights installation cost estimate.
Furthermore, it’s crucial to consider box fill (NEC Article 314). To learn more about this critical calculation, review our detailed lesson on how to calculate outlet box dimensions according to the 2023 NEC. Additionally, installations in specific locations have unique rules; for example, find out how 2023 NEC rules for ceiling fan installation in bathrooms are different to ensure full compliance.
Wiring Configurations: From Single Switch to Dual Control
The wiring method determines how the user will control the fan and light. While remote controls are common, providing dedicated wall switches is often preferred for reliability and convenience.
Standard Single Switch & Remote Control Wiring
In a basic setup, a single switch provides power to the entire fan unit. Control over the fan speed and light is then handled by pull chains or a remote. If a remote is used, the ceiling fan remote receiver wiring is a key step. The receiver is typically installed in the fan’s canopy, with the line-side wire from the ceiling connecting to the receiver’s input and the receiver’s output wires connecting to the corresponding fan and light wires.
Dual Switch Fan Light Wiring: The Professional Standard
The superior method is providing separate switches for fan and light. This requires dual switch fan light wiring. This is achieved by running a 3-conductor cable, such as 14/3 wire for ceiling fan applications (or 12/3 for 20-amp circuits), from the switch box to the fan. This cable contains a black wire (typically for the fan’s hot), a red wire (for the light’s hot), a white neutral, and a bare or green ground. At the switch box, the incoming power (line side) is split to feed two separate switches. The black and red wires then become switched legs (load side) that run up to the fan. This setup is best visualized with a proper switch leg wiring diagram. For a deeper dive into the latest code updates, explore our lesson on how 2023 NEC updates have changed lighting outlet and switch requirements.
Step-by-Step Guide: Running New Wire for a Ceiling Fan
Here is a professional process for a new installation with dual-switch control.
- Planning and Safety: De-energize and verify the circuit is dead. Plan the route for running new wire for ceiling fan from the switch location to the ceiling outlet, minimizing drywall damage.
- Install Support and Box: Access the ceiling framing. Install a ceiling fan support brace between the joists, followed by securing the fan-rated electrical box to the brace.
- Run the Cable: Pull your 14/3 (or 12/3) NM cable from the switch box location to the ceiling box, ensuring it is properly stapled and protected as per NEC Article 334.
- Ceiling Box Connections: In the ceiling box, connect the ground wire from your cable to the box and the fan bracket. Make a solid grounding conductor connection. Connect the white neutral wire from the cable to the fan’s neutral wire. Connect the black wire to the fan motor wire (often black) and the red wire to the fan’s light kit wire (often blue). Use secure wire connectors and consider making pigtail electrical connections where necessary.
- Switch Box Connections: In the switch box, connect the incoming power’s neutral to the neutral wire going to the fan. Pigtail the incoming hot wire (line side) to feed the top terminal of both switches. Connect the black wire going to the fan to the load side vs line side terminal of one switch, and the red wire to the load side of the second switch. A clear ceiling fan wiring diagram 2 switches is invaluable here.
- Mount the Fan: Assemble and mount the ceiling fan to the bracket according to the manufacturer’s instructions.
- Test and Commission: Restore power to the circuit and test both switches independently to confirm the fan and light operate as expected.
Advanced Wiring and Troubleshooting
Modern installations often go beyond simple switches. Smart fan control wiring has become increasingly popular. These controls may require a neutral wire in the switch box to power their electronics, which is why running a 3-conductor cable is always a good future-proofing strategy. Some smart systems use a wall controller that communicates wirelessly with a canopy module, simplifying the in-wall wiring to just a single switched hot.
Even with a perfect plan, issues can arise. Effective troubleshooting ceiling fan wiring is a critical skill.
- No Power: Check the breaker. Verify connections at the switch and ceiling. Ensure you have correctly wired the load side vs line side terminals on your switches.
- One Function Fails: In a dual-switch setup, if only the fan or light works, the issue is likely the specific switched leg (red or black wire) or the corresponding switch. Check connections for that specific wire.
- Remote Not Working: Check batteries. Verify the dip switches on the remote and receiver match. Confirm the ceiling fan remote receiver wiring is correct, with line and load wires properly connected.
- Fan Hums but Won’t Spin: This often points to a failed starting capacitor in the fan motor itself or a poor connection on the motor’s hot wire.
As residential electrical systems grow more complex, staying current is non-negotiable. Master residential wiring from top to bottom with our expert-led courses.
Primary Sources
- NFPA 70, National Electrical Code (NEC), 2023 Edition
- Ceiling Fan Manufacturer Installation Manuals
Frequently Asked Questions about Ceiling Fan Wiring
- What is the best way to achieve separate switches for fan and light?
- The best and most common practice is to use dual switch fan light wiring. This involves running a 3-conductor cable, like a 14/3 wire for ceiling fan, from a two-gang box with two switches up to the fan’s outlet box. This gives you two separate switched hots—one for the fan motor and one for the light kit—for independent control.
- How does a ceiling fan wiring diagram 2 switches work?
- A ceiling fan wiring diagram 2 switches illustrates how line-side power is brought into the switch box and pigtailed to feed two switches. The load side of one switch connects to the black wire (fan motor), and the load side of the other switch connects to the red wire (light kit). The white neutral wire bypasses the switches and runs directly to the fan, along with the equipment grounding conductor.
- Is a fan-rated electrical box always required for an NEC ceiling fan installation?
- Yes. Per NEC 422.18, a ceiling fan must be supported by a box or system specifically listed for that purpose. A standard light fixture box is not designed to handle the weight and dynamic vibrational forces of a fan. Using a fan-rated electrical box is a critical safety requirement of any professional NEC ceiling fan installation.
- What’s involved in smart fan control wiring?
- Smart fan control wiring can vary by brand. Many smart switches require a neutral wire in the switch box for their internal electronics to function, which is a key difference from simple mechanical switches. Some systems use a wall-mounted keypad that communicates wirelessly with a receiver in the fan canopy, simplifying the wiring to just a constant or switched hot, depending on the system’s design.
Continuing Education by State
Select your state to view board-approved continuing education courses and requirements:
Disclaimer: The information provided in this educational content has been prepared with care to reflect current regulatory requirements for continuing education. However, licensing rules and regulations can vary by state and are subject to change. While we strive for accuracy, ExpertCE cannot guarantee that all details are complete or up to date at the time of reading. For the most current and authoritative information, always refer directly to your state’s official licensing board or regulatory agency.
NEC®, NFPA 70E®, NFPA 70®, and National Electrical Code® are registered trademarks of the National Fire Protection Association® (NFPA®)
You may also like

Colorado Electrical Licensing Requirements and Reciprocity Guide

Standby Generators in DE: Navigating Coastal Storm Regulations
