How to Install or Replace a Doorbell Transformer
Expert Guide to Doorbell Transformer Installation
To properly install a doorbell transformer, a licensed electrician must first turn off power at the circuit breaker. The new Class 2 transformer is then physically secured, typically to a junction box knockout. Next, connect the 120V line-voltage wires (black to black, white to white, and ground to the green screw) to the transformer’s primary side. Finally, connect the low-voltage doorbell wires to the secondary screw terminals. This process of low voltage transformer installation is critical for both traditional chimes and modern smart doorbells. Ensuring correct chime transformer sizing and verifying the new doorbell transformer meets the device’s power requirements are essential first steps. This guide provides a comprehensive overview for professionals on how to safely install doorbell transformer units in compliance with the NEC.
Understanding the Doorbell Transformer: A Professional Overview
For any licensed electrician, understanding the function of a doorbell transformer is fundamental. It is a specific type of electrical transformer known as a step-down transformer for doorbell applications. Its primary job is to take standard 120V line voltage and reduce it to a safe, low voltage—typically in the general range of about 8 VAC to 24 VAC, with 16 VAC being the most commonly encountered rating for residential doorbell systems—suitable for doorbell circuits. This is why these devices are commonly used as Class 2 power-limited transformers when listed and installed as such; the NEC’s rules for power-limited circuits are in Article 725.
While electricians regularly work with a variety of transformers—from a massive power line transformer or a three-phase 75 kva transformer (sometimes written as 75kva transformer) in a delta delta transformer configuration, to a specialized buck boost transformer or an isolation transformer—the common door bell transformer is the most frequently encountered in residential settings. Its simplicity belies its importance. You will see its function represented by a standard transformer symbol on any professional doorbell transformer wiring diagram, indicating the separation between the primary (line voltage) and secondary (low voltage) coils.
Pre-Installation: Sizing, Selection, and Safety
Before you begin the physical work to install doorbell transformer hardware, proper planning is crucial. The two most important factors are voltage and power, often expressed in Volt-Amps (VA).
Key Considerations Before Installation:
- Verify Power Requirements: Check the specifications for the doorbell chime or smart doorbell. Many modern video doorbells have higher power needs. Understanding smart doorbell power requirements is non-negotiable to prevent performance issues. Many smart doorbells require 16 VAC and higher VA ratings — always verify the exact requirement from the manufacturer.
- Chime Transformer Sizing: A standard mechanical chime often requires on the order of 10–16 VA at 16 VAC. Video/”smart” doorbells commonly require 16 VAC and may need transformers rated in the roughly 10–30 VA range (or larger) depending on the device and whether a chime is also powered; always size the transformer for the total VA load on the circuit.
- Location, Location, Location: A hardwired doorbell transformer should be installed in an accessible location; Article 725 requires that equipment supplying Class 2/3 circuits be properly marked and accessible, and Article 110 requires access for inspection and maintenance. In practice transformers are typically mounted to an accessible junction box (attic, basement, utility closet, etc.). Do not conceal a transformer behind finished surfaces without an access panel.
- Circuit Identification: Before any work begins, positively identify the circuit powering the existing transformer and shut it off at the breaker panel. Use a voltage tester to confirm the power is off at the source.
Primary Sources for Compliance
As professionals, all work must comply with the latest edition of the National Electrical Code (NEC®). For detailed requirements on low-voltage circuits, refer directly to the source.
- NFPA 70, National Electrical Code: Access the official code language on the NFPA website. Pay close attention to Article 725 for Class 2, Class 3, and other power-limited circuits.
How to Install or Replace a Doorbell Transformer: A Step-by-Step Guide
This procedure outlines the professional steps for how to replace doorbell transformer units or perform a new installation. The process involves both line-voltage and low-voltage connections.
- De-energize the Circuit: Go to the electrical panel, identify the correct circuit breaker, and switch it to the “OFF” position. Apply a lockout/tagout device as required by safety protocols.
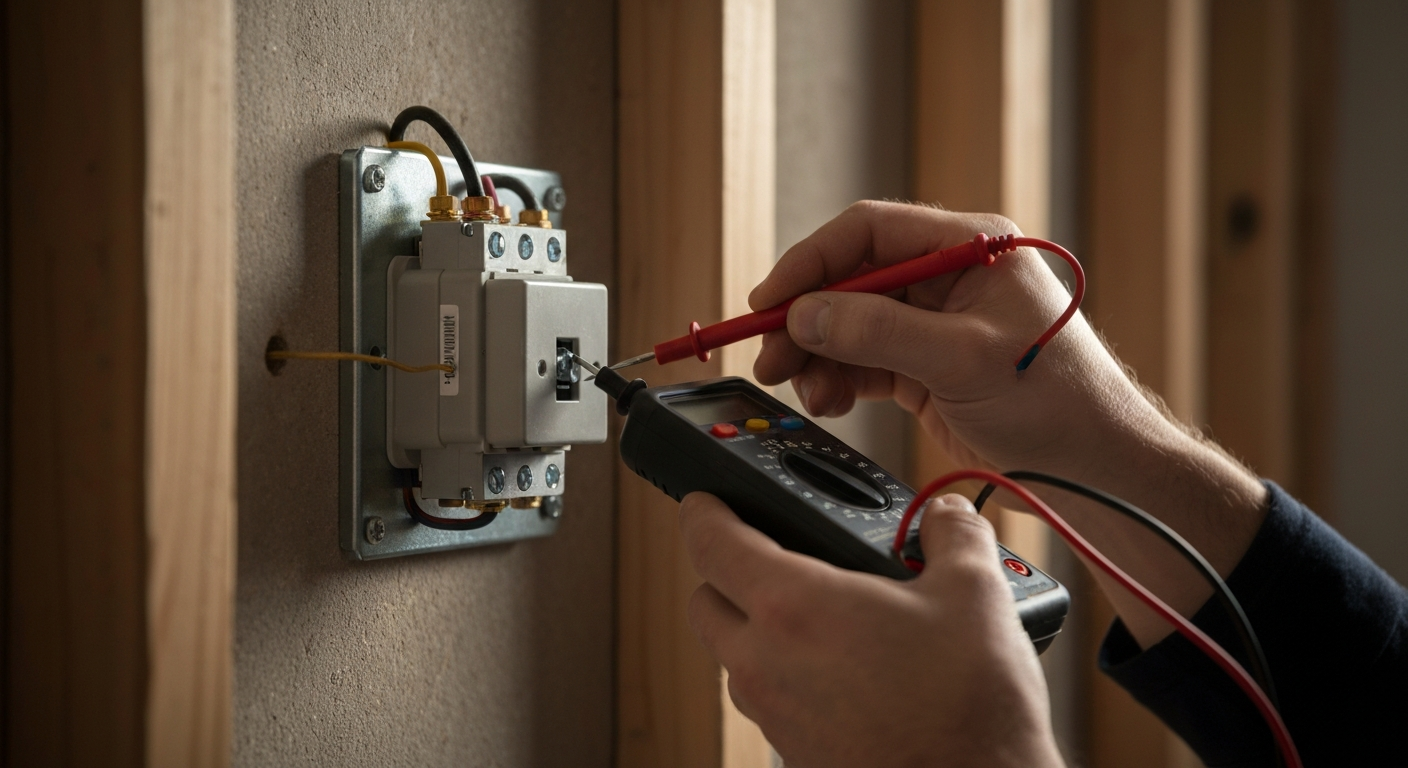
- Confirm Zero Power: At the junction box where the transformer is located, use a multimeter or a non-contact voltage tester to verify that the power is off on the 120V line-voltage wires.
- Disconnect the Old Transformer (If Replacing): Carefully disconnect the low-voltage wires from the secondary screw terminals. Then, open the junction box and disconnect the line-voltage wires (black, white, and ground). Loosen the locknut and remove the old transformer from the box.
- Mount the New Transformer: To mount doorbell transformer to a junction box, insert the threaded primary-side connector through a knockout on the box. Secure it from the inside with the provided locknut, ensuring a tight and secure fit.
- Make Line Voltage Connections: Inside the junction box, make the line voltage connections for transformer wiring. Connect the transformer’s black wire to the circuit’s black (hot) wire, the transformer’s white wire to the circuit’s white (neutral) wire, and the transformer’s green or bare copper wire to the circuit’s ground wire using appropriately sized wire nuts. Ensure all connections are secure and replace the junction box cover.
- Connect the Low-Voltage Wiring: This step addresses how to hook up a transformer for door bell chime and button wiring. Connect the two low-voltage wires from the doorbell system to the two screw terminals on the secondary side of the transformer. Polarity does not matter for a standard AC doorbell transformer. When the transformer and secondary meet the power-limited listing requirements, this is a Class 2 power-limited circuit and must comply with Article 725.
- Re-energize and Test: Remove your lockout/tagout device and switch the circuit breaker back to the “ON” position. Use your multimeter set to AC volts to test the secondary terminals. You should get a reading that matches the transformer’s rated output (e.g., ~16 VAC or ~24 VAC). Finally, test the doorbell to ensure it functions correctly.
NEC Requirements and Broader Applications of Low-Voltage Systems
All work must adhere to the NEC requirements for low voltage wiring, primarily found in Article 725. This article defines the safety standards for power-limited circuits; compliance includes using listed power sources, marking, and appropriate wiring methods. The principles of these circuits extend beyond doorbells. For instance, the rules for low voltage wiring in healthcare facilities build upon these foundational concepts but with stricter requirements. Similarly, understanding how Class 2 emergency lighting systems are wired is another critical application of these same NEC articles. The components within these systems, such as specific Class 2 emergency lighting control devices, are also defined and regulated by the code. Even a seemingly different application, like a landscape lighting transformer, often falls under similar low-voltage installation principles, which are governed by NEC Article 411.
To further broaden your expertise, consider that even in complex systems using multiple transformers in a bank, the fundamental principles of voltage transformation remain the same. Staying current with the NEC is paramount.
Master low-voltage systems and smart home installations with our comprehensive, NEC-focused continuing education courses. Stay ahead of the curve with ExpertCE.
Troubleshooting Common Transformer Issues
Even a new installation can have issues. A common task is troubleshooting doorbell transformer problems. If the doorbell isn’t working after installation, start by testing doorbell transformer with multimeter. Check for correct line voltage on the primary side and correct low voltage on the secondary side. No voltage on the secondary side could indicate a faulty transformer, but first verify there are no loose wiring connections or tripped internal overload protection. If you hear excessive buzzing or humming, this is known as transformer noise. While a slight hum is normal, loud noise can indicate an overloaded transformer or a loose lamination, warranting a replacement.
Frequently Asked Questions
-
What are the key steps to install doorbell transformer units safely?
- The most critical steps are: 1) Turning off power at the breaker and verifying with a meter. 2) Securely mounting the new transformer to an accessible junction box. 3) Correctly wiring the 120V primary side (hot, neutral, ground) inside the box. 4) Connecting the low-voltage doorbell wires to the secondary screw terminals. Always follow NEC guidelines for a safe and compliant installation.
-
How do I interpret a doorbell transformer wiring diagram for a Class 2 transformer?
- A doorbell transformer wiring diagram will show two sides. The primary side connects to the 120V AC power source (labeled “Line” or “Primary”) and will have black, white, and green wires. The secondary side (labeled “Load” or “Secondary”) has screw terminals for the low-voltage wires going to the doorbell and chime. The transformer symbol on the diagram, with two coils separated by lines, illustrates the electrical isolation between the high and low voltage sides, a key feature of a Class 2 transformer.
-
What should I do if my new doorbell transformer is making a loud transformer noise?
- A slight, faint hum is normal for an electrical transformer. However, a loud buzzing or humming transformer noise is abnormal. It can be caused by an overload (the doorbell system is drawing more VA than the transformer is rated for), loose internal laminations from a manufacturing defect, or vibrations against the mounting surface. First, verify the VA rating is sufficient. If it is, the transformer itself is likely faulty and should be replaced.
-
What’s the difference in the process to replace doorbell transformer versus a new install?
- The process to replace doorbell transformer is nearly identical to a new installation, with the added first step of disconnecting and removing the old unit. After turning off power, you disconnect the low-voltage and line-voltage wires from the old transformer before unmounting it from the junction box. The installation of the new unit then follows the exact same procedure as a new install, ensuring the new transformer meets the correct doorbell transformer voltage requirements for the system.
Continuing Education by State
Select your state to view board-approved continuing education courses and requirements:
Disclaimer: The information provided in this educational content has been prepared with care to reflect current regulatory requirements for continuing education. However, licensing rules and regulations can vary by state and are subject to change. While we strive for accuracy, ExpertCE cannot guarantee that all details are complete or up to date at the time of reading. For the most current and authoritative information, always refer directly to your state’s official licensing board or regulatory agency.
NEC®, NFPA 70E®, NFPA 70®, and National Electrical Code® are registered trademarks of the National Fire Protection Association® (NFPA®)
You may also like

Colorado Electrical Licensing Requirements and Reciprocity Guide

Standby Generators in DE: Navigating Coastal Storm Regulations
